kotest에는 아래와 같은 테스트 스타일이 있다. 아래의 스타일 중 테스트하고자 하는 스타일에 맞춰 선택하면 된다.
| Test Style | Inspired By |
| Fun Spec | ScalaTest |
| String Spec | A Kotest original |
| Should Spec | A Kotest original |
| Describe Spec | Javascript frameworks and RSpec |
| Behavior Spec | BDD frameworks |
| Free Spec | ScalaTest |
| Word Spec | ScalaTest |
| Feature Spec | Cucumber |
| Expect Spec | A Kotest original |
| Annotation Spec | JUnit |
하나씩 알아보자! 주로 사용하게 될 스타일 몇가지를 알아보자.
1. FunSpec
1. FunSpec
가장 기본이 되는 스타일인듯하다. test라는 함수를 사용하며 인자로 테스트에 관한 설명을 하는 문자열을 넣는다.
test함수 호출 후 람다를 사용하여 테스트 코드 사용.
class FUnSpecSample : FunSpec({
    test("String length should return the length of the string") { // 설명
        "sammy".length shouldBe 5 // 실제 테스트 코드
        "".length shouldBe 0
    }
})
2. String Spec
2. String Spec
String Spec은 구문을 절대 최소값으로 줄입니다. 테스트 코드를 사용하여 문자열 뒤에 람다 식을 작성한다.
FunSpec과 유사하며 test함수 없이 바로 코드 설명을 하고 람다를 사용한다.
class StringSpecSample : StringSpec({
    "strings.length should return size of string" { // 코드 설명
        "hello".length shouldBe 5 // 문자열 길이 체크
    }
})
아주 단순한 형태의 샘플이다. StringSpec을 상속받아 사용하며 코드를 설명하는 부분과 실제 동작하는 부분으로 나누어저 있다.
class StringSpecSample : StringSpec({
    "strings.length should return size of string".config(enabled = false, invocations = 3) {
        "hello".length shouldBe 5
    }
})
설명하는 부분에 config를 사용하면 구성을 추가할 수 있다.
3. Should Spec
3. Should Spec
ShouldSpec은 문맥 블록을 그룹 짓는 데 사용하고, 말단에 테스트 블록을 추가한다. 테스트를 설명하는 문자열에 대해서 context()를 호출하고, 테스트 블록 자체는 should()함수로 정의하면 된다.
class ShouldSpecSample : ShouldSpec({
should("return the length of the string") {
"sammy".length shouldBe 5
"".length shouldBe 0
}
})class ShouldSpecSample1 : ShouldSpec({
context("test1") {
should("return the length of the string") {
"sammy".length shouldBe 5
"".length shouldBe 0
}
}
context("test2") {
context("Addition") {
should("3과 같다.") { (1+2) shouldBe 3 }
}
context("3") {
should("3보다 큰가?") {3 shouldBe 1*3}
}
}
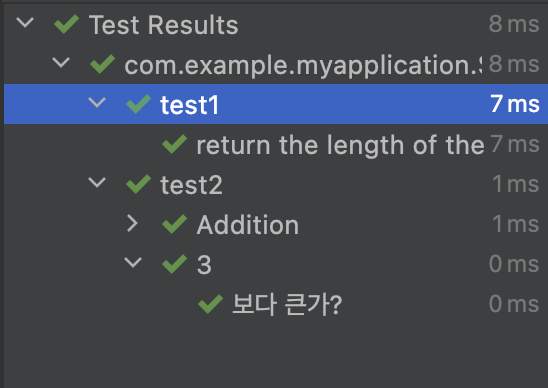
})아래와 같이 context를 기준으로 분류하여 보여준다.
4. BehaviorSpec
4. BehaviorSpec
- BDD를 사용하려면 가장 많이 쓰게될 스타일이다.
- BDD(Behavior Driven Development)
- 시나리오 가반(유저 행동 기반)의 테스트 케이스 작성 및 개발
- Given, When, Then구조를 가진다.
- Given : 시나리오 진행에 필요한 값 설정
- When : 시나리오를 진행하는데 필요한 조건 명시
- Then : 시나리오 완료시 보장해야하는 결과 값 명시
- TDD는 메소드 기반의 테스트, BDD는 유저 액션 시나리오 기반의 테스트
- 무조건 BDD를 쓰는 것이 아닌 상호보완
//build.gradle(app)
dependencies{
		testImplementation 'io.kotlintest:kotlintest-runner-junit5:3.3.2'
    testImplementation 'io.mockk:mockk:1.9.3.kotlin12'
}

// test.kt
class BehaviorTest : BehaviorSpec({
    Given("등급 계산기") {
        val calculator = spyk(GradeCalculator())

        every { calculator.totalMarks } returns 100
        val total = calculator.totalMarks

        When("점수가 90점 이상일 경우") {
            val grade = calculator.getGrade(93, total)

            Then("등급은 A") {
                grade.shouldBe("A")
            }
        }

        When("점수가 80점 이상 89점 이하일 경우") {
            val grade = calculator.getGrade(86, total)

            Then("등급은 B") {
                grade.shouldBe("B")
            }
        }

        When("점수가 70점 이상 79점 이하일 경우") {
            val grade = calculator.getGrade(66, total)

            Then("등급은 C") {
                grade.shouldBe("C")
            }
        }

        When("점수가 60점 이상 69점 이하일 경우") {
            val grade = calculator.getGrade(66, total)

            Then("등급은 D") {
                grade.shouldBe("D")
            }
        }

        When("점수가 59점 이하일 경우") {
            val grade = calculator.getGrade(53, total)

            Then("등급은 F") {
                grade.shouldBe("F")
            }
        }
    }

})

class GradeCalculator {

    var totalMarks = 0

    fun getGrade(obtainedMarks: Int, totalMarks: Int): String {
        val percentage = getPercentage(obtainedMarks, totalMarks)
        return when {
            percentage >= 90 -> "A"
            percentage in 80..89 -> "B"
            percentage in 70..79 -> "C"
            percentage in 60..69 -> "D"
            else -> "F"
        }
    }

    private fun getPercentage(obtained: Int, total: Int): Int {
        return  (obtained / total.toFloat() * 100).roundToInt()
    }
}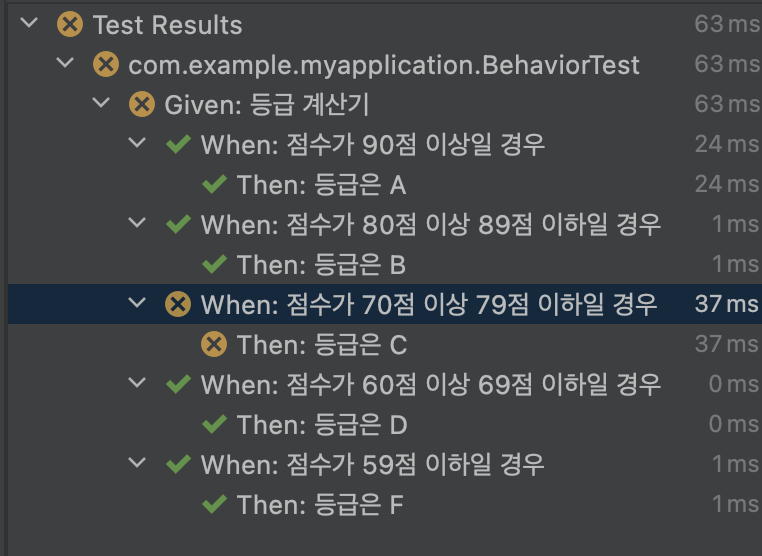
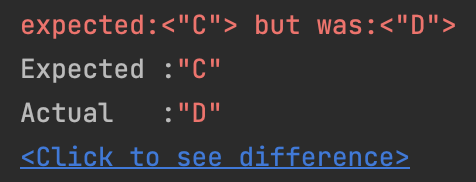
70~79점 구간에 66점을 넣어주었더니 오류가발생하였다. 이처럼 테스트 코드는 정상적으로 잘 돌아간다.
테스트 결과도 한눈에 보기 편하다.
참조 https://devvkkid.tistory.com/197#toc-Testing Styles https://velog.io/@devoks/TDDBDD https://www.zuhaibahmad.com/android-spec-testing/
Uploaded by N2T